Snowy Mixed Media Frame
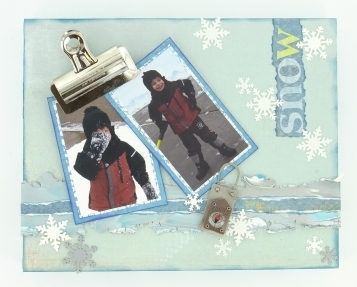
Capture treasured memories in a Snowy Mixed Media Frame. You will employ mixed media art techniques in order to create a truly stunning tabletop or wall decoration. Memories of your kids throwing snowballs or building snowmen should be displayed in a winter-themed case, and this is the perfect project to document those memories. Play with clay embellishments and various other materials to create a decorative wintry project. After all, clay is the perfect material to document memories in the snow, because you shape the clay just like your kids shape the snowballs!

Materials:
- 1 Block of Premo! Accents: Silver - 2 oz
- 1 Block of Premo! Accents: Frost White Glitter - 2 oz
- 1 Block of Premo! Sculpey®: White - 2 oz
- Clay Conditioning Machine
- Industrial Chic™ Compass Charm, MKP20342-123
- Scrapbook paper – 4 Blue patterns
- Craft Punches Martha Stewart Crafts™ Arctic Snowflake and Alpine Snowflake
- Craft Punch – Recollections™ Petite 25 Snowflake
- Artist’s Loft Painted Wooden Cradle Board – 1”, 8” x 10”
- StazOn® Stamp pad to coordinate with scrapbook paper
- Scotch® Quick-Dry Adhesive
- Bull nose clip – 2 ½” across
- Ceramic tile – smooth
- Self-adhesive letters to coordinate with scrapbook paper
- Double sided tape
-
Photos
Instructions:
Start with clean hands and work surface area. Good work surfaces include wax paper, metal baking sheet, or disposable foil. Knead clay until soft and smooth. For best results, clean your hands in between colors. Shape clay, pressing pieces together firmly. Bake on oven-proof glass or metal surface at 275 °F for 30 minutes per 1/4 in thickness. For best baking results, use an oven thermometer. DO NOT USE MICROWAVE OVEN. DO NOT EXCEED THE ABOVE TEMPERATURE OR RECOMMENDED BAKING TIME. Wash hands after use.
Begin by preheating oven to 275 °F. Test temperature with oven thermometer for perfectly cured clay. For best results, condition all clay by running it through the Clay Conditioning Machine several passes on the widest setting. Fold the clay in half after each pass and insert the fold side into the rollers first.

1. Trim and adhere your lightest scrapbook paper to the Cradle Board. Ink the edges and sides of the board with the stamp pad ink.

2. Create the clay strip that will be placed about 1” up from the bottom of the board. Using the Clay Conditioning Machine on the #2 setting roll a sheet of White clay. Try to keep the strip narrow. Roll a #4 sheet of Turquoise clay and a separate one of Silver Clay. Tear off pieces of the Turquoise and the Silver and put on the sheet of White.

3. Roll the sheet clay through the Clay Conditioning Machine on the #2 setting. Keep folding the clay in half and putting back into pasta machine until you have a pleasant blend. Keep the clay strip narrow, about 1 ½” wide and try to keep the edges “raw” looking. You’ll need the strip to be 10” long. Place on a baking sheet, lift parts of the edge up and bake as directed above.
4. Creating the snowflakes – Roll sheets of White, Frost White Glitter and Silver through the Clay Conditioning Machine on the thinnest setting. Start with thicker sheets and keep raising the number until the sheet of clay is as thin as possible. Place sheets on a ceramic tile stretching a bit as you place on the tile and bake as directed above. Allow to cool.
5. Using the punches punch an assortment of snowflakes.
6. Glue the clay strip on the cradle board about 1” from the bottom. Add a strip if ripped paper whose edges have been inked.
7. Mat your cropped photos with two shades of scrapbook paper and ink the edges. Adhere mattes to photos with quick dry adhesive. Place in Bullnose clip in a pleasing angle. Adhere clip with photos to frame with double stick tape.
8. Using the self adhering letters create the word snow on a dark shade of the scrapbook paper. Rip around the word, ink the edges and adhere to the frame.
9. Adhere the compass charm using double stick adhesive.
10. Now it’s time to add your snowflakes. Create a pattern you like and adhere the snowflakes with the quick dry adhesive.

