Lavender Flowers and Flourishes Artist Trading Block
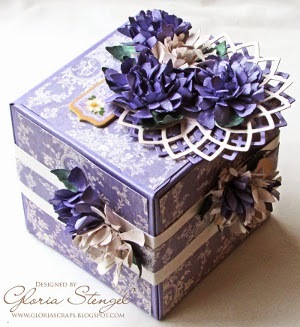
Have you heard of artist trading blocks? Similar to artist trading cards, these 3D crafts allow you to express your creativity on a smaller scale to create beautiful DIY home decor! The Lavender Flowers and Flourishes Artist Trading Block is a fantastic paper craft idea for the paper artist. Use beautiful paper that die cuts like a dream. The flowers adorning the block are eye catching and impressive to behold. For a fun small project that will showcase your creativity, explore this beautiful tutorial.

Materials:
- WorldWin Papers: Elan Metallics Candied Violet, Moss
- WorldWin Papers: Petallics Ice
- Designer Paper: Graphic 45 Secret Garden Sun Kissed
- Chipboard tag: Graphic 45 Secret Garden
- Ink: Ranger Distress Dusty Concord, Shaded Lilac
- Die cut templates: Spellbinders Jewel Flowers and Flourishes, Carnation Creations, Foliage, Lotus Pendant
- Tools: We R Memory Keepers Gift Box Punch Board
- Adhesive: Scotch 3M ATG tape; Scrapbook Adhesives by 3L 3D Foam Squares; Aleene's Tacky Glue; Scor-tape
Instructions:
1. The finished box is 4 x 4 x 4 inches, which means you need one 12 x 12-inch sheet of cardstock to create the box. Follow the directions on the punch board to score and fold the box. Use a strong adhesive to assemble the box. Since my box is for display only, I glued the top flap closed. (You can make boxes in sizes from 1 3/4 x 1 3/4 x 1 3/4 inches to 4 x 4 x 4 inches. (If you have access to paper larger than 12 x 12-inches, I am sure you can figure out how to make larger boxes!)

2. Trim 6 pieces of printed paper to 3 3/4 x 3 3/4-inches and attach to the sides, bottom, and the top of the box. (If you want to use the box as a gift box, you will NOT cover the top and you would need to be aware of how the closure works before gluing any decor to the top of the box.)

3. To create the flowers, I cut various flower shapes from Elan Metallics Candied Violet and Petallics Ice cardstock. I also cut leaves from Elan Metallics Moss cardstock. I used a variety of die cut templates to cut the flowers (see the supply list).

4. Lightly spray all the flower and leaf die cut shapes with water. Crumple the flowers and leaves and allow to air dry. Since I am using such heavy weight cardstock, I needed the moisture to break down the fibers of the paper, allowing me to work with it easier. (You could also spray the flowers with a colored mist, rather than plain water.)
5. Trim out two doily shapes from the Candied Violet and Ice cardstock and ink with distress inks. (If you do not have access to a doily-shaped die cut template, you could use paper doilies, purchased from a craft store.)
6. Using foam tape, attach the doilies to the top of the box as shown.

7. After the paper flowers and leaves are dry, gently unfold each item. Ink the flowers and leaves with distress ink as desired, and then shape them with a stylus and a foam mat or with your fingers.
8. Glue each layer together to form flowers. My flowers resemble carnations or dahlias. Arrange the flowers and leaves onto the top of the box and glue in place. You may choose to add a chipboard tag or other element to the box, as desired.

9. Cut several 1 1/2-inch wide strips of Petallics Ice cardstock and wrap them around the box to form a "belly band." Trim excess cardstock and glue the seams securely.
10. Cut several 3/4-inch wide strips of printed paper and wrap them around the cardstock band as shown.

11. Add more flowers and leaves to the front and sides of the box, as desired. (I used flowers to hide the seam on the side of the box.) The Elan Metallics and Petallics cardstock is very shimmery, adding an elegant touch to the project.

12. Place your box on your desk or table and enjoy!


