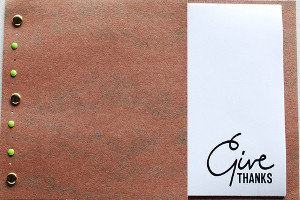
Grateful Heart Card

Do a little something fun to celebrate Turkey Day this year and kick off the holiday season by spreading some cheer with this Grateful Heart Card. Usually, Christmas is probably the first thing that comes to mind when holiday cards are involved, but trust us when we say your friends and family will love this adorable tiding. This quick and easy tutorial shows you how to make a professional-looking card using scrap booking supplies, and other materials you'll easily be able to rustle up in your crafting closet.
Estimated CostUnder $10
Time to CompleteUnder an hour
Primary TechniqueGeneral Paper Crafting
Project or Page SizeCard
Type of Paper UsedCardstock

SeasonThanksgiving
Materials:
- Scrapbook Adhesives by 3L
- Adhesive Sheets 4 x 6"
- Creative Photo Corners Ivory
- 3D Foam Hearts
- 3D Foam Squares
Instructions:
-
First, trim a scrap of cardstock to a little larger than the die you’ll be using. Peel the yellow layer off the Adhesive Sheet and place it adhesive side down onto the cardstock. Tip: Save the yellow sheet for later!

- Next peel off the back of the adhesive sheet, which leaves you with cardstock covered in a thin layer of adhesive.

- Next, cover the adhesive with ribbon.

- Optional step: alter the ribbon! You can Gelatos to create fall colors on the ribbon. If your ribbon is already just the way you want it, skip this step.

- Rub the color in with your finger, then add a bit of water to continue to blend it.

-
Once the ribbon is colored, stamp a sentiment, then die cut it. Did you save the yellow sheet from above? Place it over any exposed adhesive before die cutting, and your paper won’t stick to the cutting plates!

-
Use your finger to add pigment powder to 3D Foam Heart. Attach the heart to the ribbon. To keep it the same height as the rest of the die cut, trim a 3D Foam Square to support the edges, then add more around the back side of the die cut.

-
See how that looks? Enjoy your completed project.