Vintage Floral Birthday Card
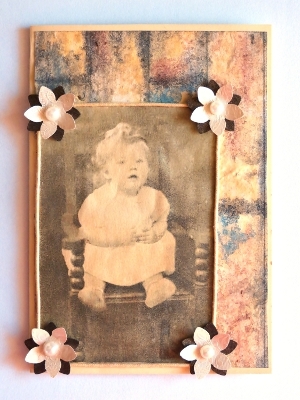
Send warm wishes to your loved one on their birthday with the Vintage Floral Birthday Card. Vintage crafts are all the rage, and unique homemade birthday cards like this are hard to come by. Use a printout of an antique photo and age it with the help of instant coffee. Add a background that resembles a wooden oak panel and some vintage flowers, and you are ready to bring birthday wishes to a special friend or colleague. This card is sure to become a legend in its own lifetime and will be treasured for many years.

A. Ageing the Photo
Materials:
- Attached Vintage Photo
- Two Tablespoons of Instant Coffee
- Half a Cup of Water
- Two Baking Trays
- Hairdryer
- Iron and Ironing Board
Instructions for Ageing the Photo:
1. Print the photo at a size of 3” x 5”.

2. Make a mixture of the coffee and the water and pour it into a baking tray.
3. Put the photo upside down in the baking tray and leave in the tray for 5 minutes.

4. Carefully remove the photo and put into the second clean baking tray.
5. Dry the photo with the hairdryer.
6. At a low heat setting, iron out any creases.

B. Creating the Vintage Oak Wood Paneling Background
Materials:
- 130 gsm White Watercolor Paper from a Spiral Watercolour Pad
- Teabag
- Salt
- Staedtler 12-Color Watercolor Set
- A 10/32” Paint Brush
- Small Plastic Bowl with Water
- Pencil
- Ruler
Instructions for Making the Oak Wood Paneling Background:
1. Draw lines across the paper approximately 1” apart.

2. Wash the whole paper with the yellow ochre color.
3. Add tea leaves to the paper while the paper is still wet.

4. Paint black watercolor over the lines and add salt to the paper while the paint is still wet.
5. Draw horizontal lines with the black paint to create the effect of the paneling.
6. Add an uneven wash with the dark brown paint.
7. Add more salt and tea leaves to the paper while it is still wet.
8. Allow to dry thoroughly.
9. Use your finger to gently rub off the salt and tea leaves.

C. Making the Card:
Materials:
- 8.2” x 6” Vanilla Colored Cardstock
- 5.5” x 3.7” Cut from Background Made in b
- Printout of Photo Aged in a Cut to 3” x 4.3”
- Leftover Piece of Embossed Metallic Cream Colored Paper
- Leftover Piece of Dark Metallic Copper Paper
- 0.2mm Wide Waxed Caramel Colored Cord
- Four Self-adhesive 3mm Pearl Stickers
- Large Petal Palm Punch from Xcut, code xcu 261811
- Pencil
- Ruler
- Pair of Standard Scissors
- Quick-drying Glue
Instructions for Making the Card:
1. Score the 8.2” x 6” vanilla colored cardstock to create a card sized 4.1” x 6”.
2. With the fold at the left, centre and glue the piece cut from the background to the front of the card.
3. Glue the aged printout of the photo to the bottom left corner of the card.
4. “Frame” the photo with the waxed cord.
5. Cut four flowers each from the metallic cream colored and dark metallic copper papers.
6. Glue the cream flower on top of the copper flower, but do not glue it down completely, so that you can slightly bend the petals of the cream flower upwards. Do the same with the other flowers.
7. Add a pearl sticker to the centre of each flower.
8. Glue a flower onto each corner of the framed photo.

Read NextHappy Birthday Button Card

