Wintry Christmas Celebration Card
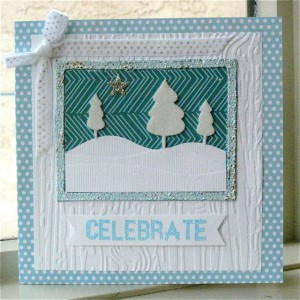
Show your appreciation for a white Christmas with the Wintry Christmas Celebration Card. If you're looking for unique Christmas card ideas, this is an excellent place to start. Step away from the traditional red and green and embrace the blues and whites of wintry hues. Layer panels of card stock in different patterns and textures to add interest. The chevron sky background is particularly eye catching! The snowy trees and hills are simple and effective. Celebrate the Christmas season with a winter wonderland card.

Materials from Scrapbook Adhesives by 3L:
- E-Z Dots Permanent
- Crafty Foam Tape White
- 3D Foam Frames
- 3D Foam Trees
- 3D Foam Stars
- Crafty Power Tape
- Dodz Medium

Other Materials:
- Spellbinders Embossing Folder
- Lawn Fawn Papers
- Bazzill card stock
- Stampendous Ink
- Embossing Powders and Glitter
- May Arts Ribbon
- Some Odd Girl Stamp Set
- Westcott Trimmer and Scissors
Instructions:
1. To begin, dry emboss plain white card stock with a Spellbinders wood grain embossing folder.

2. Using the E-Z Runner™ Permanent Dots adhesive, attach this white embossed piece to the card base.

3. To create the winter scene, adhere a 3D Foam Frame to a piece of patterned paper and then heat embossed it with Stampendous Shabby Blue Embossing Enamel.


4. After a few moments of cooling off, cut out the Frame and prepare to design the winter scene.

5. First, make the snowy hills by cutting 3 wavy strips of white card stock and adhering them to the inside bottom edge of the frame.


6. Then add the other Designer Shapes: 3D Foam Trees and one 3D Foam Star.

7. Dump white glitter onto the trees and silver glitter onto the star, rubbing in, then brushing off excess.

8. The Crafty Power Tape helped attach the ribbon securely. Place one medium Dodz™ behind the knot of the bow.

9. Finally, stamp and heat emboss the sentiment “Celebrate” and adhere it with a strip of Crafty Foam Tape.


Here is a photo of the dimension the Foam Adhesives and Designer Shapes add to the card. It’s still flat enough to slide into a standard envelope and mail in the post.

Your Recently Viewed Projects
mulberrygalprinces s
Oct 28, 2016
This is a really nice project. Not only do you give a list of supplies and written instructions, but you also included pictures of each step. I think even a clutz like myself should be able to make this one. Thank you so much for your generosity in offering this project.
Report Inappropriate Comment
Are you sure you would like to report this comment? It will be flagged for our moderators to take action.
Thank you for taking the time to improve the content on our site.

