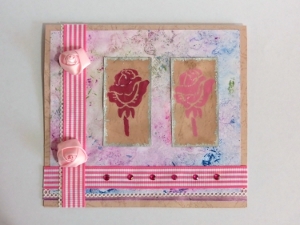
Shades of Pink Roses Card
Use watercolor pencils to create your own unique background for a vivid Shades of Pink Roses Card. Add rose tiles in two different shades of pink and send a colorful wish to a friend or colleague. Use the card to bring birthday greetings, or use it just to brighten someone’s day. The ribbon roses are an added embellishment that give the card yet another shade of pink. This card making idea can even be used as a cheerful homemade Mother's Day card. Welcome spring with many shades of pink!

Materials:
- Sheet of Beige Pink Scrapbook Paper
- A4-sheet of Ordinary White Printer Paper
- A4-sheets of Light Pink Sugar Paper
- Jablo’s Rose Stamp, g006 (see www.jabtex.co.za for international stockists)
- Acrylic Paint in the Following Colors: Sweet Memories (Bright Pink) and Plum
- Faber Castel Watercolor Pencils: Dark Blue (451); Purple (434); Light Green (470); Dark Green (467) and Light Blue (447)
- Plaid Royal Coat Dimensional Magic
- Pilot Silver Marker Pen
- 0.2” Wide White Decorative Lace Tape
- 0.5” Wide Pink and White Striped Belt Ribbon
- 0.6” Wide Light Purple Organza Ribbon
- Six Small Cerise Pink Flat Back Crystal Beads
- Two 1” Pink Ribbon Roses
- Salt
- Pencil Sharpener
- Water Spray Bottle
- Hairdryer
- Fine Paintbrush
- Pair of Standard Scissors
- Quick Drying Glue
- Pencil
- Ruler
Instructions:
1. Sharpen the watercolor pencils over the A4 sheet of printer paper, scattering the different colored pencil shavings all over the paper.
2. Spray the shavings with the water spray bottle and then immediately add salt over the wet shavings. The salt will help the different colors to blend together.
3. Dry the paper with the hairdryer and gently rub off the salt and shavings. The paper will now have a slight textured appearance.

4. Cut a piece sized 10.6” x 5.7” from the beige pink scrapbook paper. Fold this in half to create a card sized 5.3” x 5.7”.
5. With the fold at the top, glue the light purple organza ribbon in place just above the bottom edge of the card. Glue the decorative lace tape in place close to the bottom edge of the purple ribbon, and cut off any protruding edges.

6. Cut a piece sized 4.6” x 5.4” from the colored A4 sheet of printer paper and glue it to the front of the card.
7. Glue the belt ribbon in place on the bottom of the card.

8. Add a strip of decorative lace tape to the left of the card, and then glue the second piece of belt ribbon in place on the left of the card, slightly overlapping the lace tape.
9. Cut two “tiles”, each sized 1.3” x 2.6”, from the remaining beige pink scrapbook paper.
10. Use the paint brush to apply an even layer of the sweet memories paint onto the Jablo stamp. Transfer the image onto the first beige pink “tile.”
11. Clean the stamp and brush, and now stamp the second rose on the other “tile” with the plum paint.

12. Use the Pilot silver marker pen to add a border pattern all around the two rose “tiles.” Allow to dry thoroughly.
13. Add Dimensional Magic to the front of the “tiles” and allow to dry for at least 3 hours.
14. Glue the two “tiles” to the front of the card.
15. Add the finishing touches with the ribbon roses and the flat back crystal beads.

Want to see more pretty card making ideas like this one? Be sure to subscribe to our newsletter, The Paper Post, and have the latest and greatest paper crafts delivered right to your inbox!
Read NextPrintable Proverbs Mother's Day Card

