Bright Burgundy Blooms Handmade Card
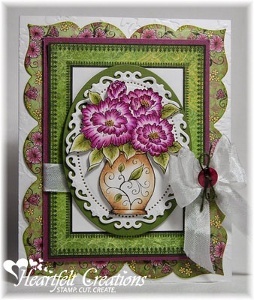
Say hello to spring with beautiful floral blooms! The Bright Burgundy Blooms Handmade Card is a marvelous card making tutorial that will ignite your creativity. Add beautiful paper flowers, die cut frames, and other embellishments to complete a detailed and ornate card for a loved one. This card is sure to be one of a kind, and the recipient will be delighted to get it. Don't forget a ravishing ribbon bow! The details and colors are what make this card really pop.

Materials from Heartfelt Creations:
- HCPC 3582 Majestic Morning Bouquet PreCut Set
- HCDP1 239 Majestic Morning Paper Collection
- 209503 Floral Ovals
- 354802 Classic Oval Lg
- 159723 Art Institute Glue - Dries Clear
- 368770 Scor-Pal Measuring & Scoring Board
- 452255 Grand Calibur
Other Materials:
- Solar White Cardstock (Neenah)
- White Cardstock (Recollections)
- Grape Gusto Cardstock (Coredinations)
- Onyx Black Ink (VersaFine)
- Green with Envy (Powder Puff)
- White Seam Binding (Really Reasonable Ribbon)
- Labels 23 Grand Die (Spellbinders)
- Rosa Embossing Folder (Cuttlebug)
- Champagne Microbeads (Recollections)
- Bow-Easy
- Button
- Green Twine (May Arts)
- Mineral Spirits
- Prismacolor Pencils: Ginger Root, Light Umber, Chocolate, Dark Brown, Black, Kelp Green, Marine Green, Dark Purple, Black Cherry, Black Raspberry
Instructions:
-
Card measures 5 3/4" x 4 5/8" with white card stock. Place card in folder and emboss through both layers.
-
Stamp flower image on Solar White with Onyx Black Ink, color with pencils, and fussy cut image.
-
Die cut Floral Ovals with white card stock, die cut green with Classic Ovals Large, and then glue 2 pieces together.
-
Add image to ovals with pop dots.
-
Add microbeads to flower centers.
-
Cut card front from designer paper and add a piece of white card stock to cover area inside of green frame.
-
Matte with Grape Gusto and wrap ribbon around and secure to back.
-
Cut green and purple flowered designer paper with Labels 23 Grand Die and glue to card base.
-
Add green frame with pop dots and image with pop dots.
-
Add bow and button with twine as shown.
- For inside of card, trim card front from designer paper, matte with green card stock, and glue to inside of card.

