Beauteous Butterflies Thank You Card
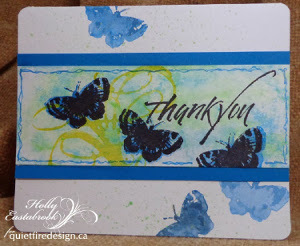
Make your very own DIY thank you cards with this fabulous tutorial. The Beauteous Butterflies Thank You Card is the perfect handmade card for spring. Learn how to color with watercolor crayons when you follow the tips and techniques outlined in this tutorial. The butterflies and elegant calligraphy thank you stamp are lovely touches. When completed, your card will have a soft and inviting appearance. Learn how to use a new medium not one, not two, but three different ways with this project.
Materials:
- Butterflies/Dragonflies Stamp Set from Quietfire Design
- Flourishes 1 Stamp from Quietfire Design
- Thank You Stamp from Quietfire Design
- Jet Black Archival Ink
- Watercolor Crayons
- White Card Stock
- Blue Mat
- Blue Gel Pen
- Spray Bottle of Water
- Acrylic Block
- Bristle Brush
- Heat Tool (Optional)
Instructions:
1. This card uses watercolor crayons, three ways.To make the narrow center strip, lightly spray the cardstock with water. Scribble the crayon onto an acrylic block, add a little spritz of water.
2. Then drag the block across the cardstock. Apply more color this way, adjusting the amount of water, using less and less. Let the cardstock dry. You may use your heat tool to speed this up.
3. Select the small butterfly from the Butterflies/Dragonflies stamp set. Peel back the paper from the crayon, dip it in water and color directly onto the stamp. It will be very juicy, and it should be for your base layer butterflies.
4. The yellow flourish is done the same way, using the large stamp from the Flourishes 1 stamp set. It was done before the butterflies. Let it dry. You'll notice that this method creates speckles and spatters all around- very painterly!
5. Jet Black Archival Ink is used to stamp the butterflies over the blue watercolor butterflies, as well as the Thank You sentiment.
6. After stamping three butterflies with blue WC crayon and letting them dry, add spatter to the card base, To spatter, scribble on the acrylic block, as before, then pick up the color with a very wet bristle brush. Drag the brush across your finger or another brush handle, to create the spatters.
Once the cardstock is dry, adhere the 'thank you' piece to a blue mat, then adhere that to the card base. Use a blue gel pen to draw a double squiggly line around the center panel.
Find this fabulous project along with others in our new collection, 26 Sweet Spring Paper Craft Ideas!
Read NextBright Hello Greeting Cards
Your Recently Viewed Projects
forrestwife
Mar 12, 2014
Is there a link so we can go back and see the original post? Great project
Report Inappropriate Comment
Are you sure you would like to report this comment? It will be flagged for our moderators to take action.
Thank you for taking the time to improve the content on our site.

