Designer Floral Gift Wrap
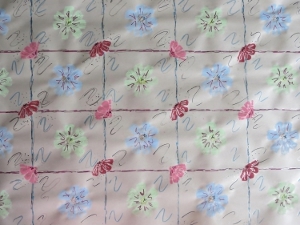
Make homemade gift wrap for spring with this Designer Floral Gift Wrap tutorial. Turn ordinary unprinted newsprint paper into designer gift wrap with this expressive art project. Use cosmos flower stamps, some bright colored paint and felt-tip pens to decorate your newsprint. You will create gift wrap that will make the recipient feel spoiled even before unwrapping the gift inside. The beauty of this project is that the design is foolproof. There is no right or wrong, just an opportunity to satisfy your inner creativity.

Materials:
- Unprinted Newsprint Paper
- Jablo’s Cosmos Stamps, pf 007 (see www.jabtex.co.za for international stockists)
- Acrylic Paint in the Following Colors: Lime Green; Powder Blue; Sweet Memories (Pink) and Plum
- Colored Felt-Tip Pens: Blue; Red; Purple, Orange and Yellow
- Pilot Silver Marker Pen
- Artline 210 Fineliner Pen
- Elmer’s Poster Tack
- Paintbrush
- Standard Scissors
- Pencil
- Ruler
Instructions:
1. Use a piece of Poster Tack on each corner of the strip of unprinted newsprint paper and stick it to a flat working surface.
2. Using the pencil and ruler, lightly mark out rectangles sized 4” x 4.6” onto the strip of newsprint paper.
3. Follow a checkerboard design to stamp the powder blue and lime green cosmos flowers: Use the paint brush to apply an even layer of the lime green acrylic paint onto the biggest Jablo’s stamp. Be careful not to apply too much or too little paint to the stamp, as you will end up with an uneven effect. Transfer the image onto the newsprint paper and then carefully lift the stamp. Stamp the rest of the green blocks in the same manner.

4. Clean the stamp and brush, and now fill the open blocks with the blue flowers.

5. Now use the two smaller stamps, and again following a checkerboard design, stamp the corners with the sweet memories (pink) and plum flowers.
6. Allow all the stamped images to dry thoroughly.
7. Use the colored felt-tip pens to highlight the pencil lines around each rectangle. Use purple on the horizontal lines and blue on the vertical lines. To create a more interesting effect, do not use a ruler. Rather draw free-hand horizontal or vertical squiggly lines.
8. Use the Pilot silver marker pen to draw free-hand horizontal or vertical squiggly lines over the blue and purple lines. Add some broken black lines to add some depth to blue and purple lines.
9. Use the red and orange felt-tip pens to add some squiggly shapes to the blue flowers, and purple and yellow to add some squiggly shapes to the green flowers. Finish it off by adding a touch of silver and black to the centre of each green and blue flower.
10. Use the silver and black pens to add some detail to the pink and plum flowers.
11. Add some S-shaped doodles in the corners of each rectangle.
12. Finish it off by adding silver and black dots to the corners of the rectangles.


